Yes, you can print glossy stickers at home with simple tools. Many people want stickers that look professional but do not want to spend much money. Picking the right printer and glossy vinyl sticker paper helps make stickers that are bright, waterproof, and last a long time. Beginners sometimes have trouble choosing good materials, making neat cuts, or keeping colors bright.
The table below lists common problems and easy fixes:
Challenge Aspect | Description | Recommendations |
|---|---|---|
Using the wrong paper makes stickers weak | Pick glossy vinyl for bright, strong stickers | |
Cutting and Size | Cuts can be messy or the size can be wrong | Use a ruler and a sharp craft knife |
Print Quality | Prints can look blurry or not bright | Make your design at 300 DPI or higher |
Key Takeaways
Pick glossy vinyl sticker paper and an inkjet printer. This makes stickers bright and waterproof. The stickers will last a long time. – Make your sticker designs at 300 PPI. Use easy tools like Canva or Vectornator. This helps your stickers look clear and simple. – Use sharp scissors or craft knives to cut neatly. Try a cutting machine if you have many stickers or tricky shapes. – Change your printer to ‘cardstock’ or ‘glossy paper’ mode. Print one sheet at a time. This stops jams and smudges. – Let your stickers dry all the way before you cut them. Put a clear laminate on top for more protection. Keep your stickers in a cool, dry place.
Choosing the right materials is the first thing you should do. Vinyl sticker paper comes in different types. Each type has its own good points for making glossy stickers. The table below shows how some popular types compare for durability:
Product Type | Water Resistance | UV Protection | Dishwasher Safe | Contribution to Durability |
|---|---|---|---|---|
Glossy Printable Vinyl | Water-resistant | Moderate | No | Protects against light moisture and moderate sunlight, suitable for indoor or mild outdoor use. |
Clear Printable Vinyl | Water-resistant | Moderate | No | Good for light outdoor use with some moisture and UV protection. |
Matte Printable Vinyl | Highly water-resistant | High | Yes | Withstands damp conditions, frequent washing, and strong adhesion, ideal for outdoor and washable items. |
Laminating Sheets + Vinyl | 100% Waterproof | Maximum | Yes | Provides complete waterproofing, maximum UV protection, and scratch resistance, extending sticker lifespan. |
Glossy sticker paper makes colors look brighter and shinier. It reflects more light than matte paper. This makes designs stand out more. This is important when you compare glossy and matte stickers. Glossy finishes are shiny and deep. Matte finishes look soft and not shiny. Both last longer if you laminate them. But glossy paper is better for strong and waterproof stickers.
Inkjet printers with dye-based inks are best for glossy sticker printing. These printers make bright colors and clear details. Some good printers are Canon PIXMA Pro-100, Epson EcoTank ET-8550, and HP DeskJet 2855e or 3755. These printers have rear feed trays. This helps stop jams when using thick vinyl sheets. Laser printers can be used too. But they might not make colors as bright. They can also cause problems with heat on vinyl.
You need some basic tools to make stickers. Scissors, a craft knife, and a ruler help you cut neatly. For stronger stickers, use clear laminating sheets or waterproof sprays. These protect stickers from water and sunlight. These tools help your stickers last longer and look nice.
It is important to use the right printer. Inkjet printers work best with glossy vinyl. Make sure your sticker paper matches your printer. Print one sheet at a time. Use the right print settings like ‘Photo Glossy Paper’. This helps stop jams and gives you good prints. Flatten your sheets before printing to avoid feeding problems.
Tip: Always print a small test batch first. This helps you check if everything works well and looks good.
Design Custom Stickers

Online Tools and Software
To design your own stickers, you need the right software. There are many online tools and apps for this. Some are easy for beginners, while others are for experts. The table below shows some popular choices:
Tool | Description | Pros | Cons | Pricing |
|---|---|---|---|---|
Adobe Illustrator | Advanced vector design for professionals | Precise editing, infinite scaling | Steep learning curve, subscription | $239.88/year |
Procreate | Digital art app for iPad | Realistic brushes, intuitive interface | iPad only, fewer templates | $9.99 (iPad) |
Canva | Web-based design tool for all skill levels | Simple tools, free version available | Limited advanced features | Free/Paid |
Vectornator | Vector design for beginners | Easy to use, accessible | N/A | Free |
Sketchbook | User-friendly digital art app | Custom brushes, free | Fewer advanced features | Free |
Cricut Design Space | Beginner-friendly, integrates with Cricut machines | User-friendly, real-time preview | Requires Cricut hardware | Free/Paid |
Canva and Vectornator are good for beginners. They are simple and free to use. Adobe Illustrator and Procreate have more features for experts. Sketchbook is free and easy for anyone.

Sizing and Layout
Sticker size and layout change how your stickers look and print. Sticker sheets come in many shapes and sizes. The tables below show some common choices:
Label Size (inches) | Labels per Sheet | Sheet Size (inches) |
|---|---|---|
3″ x 4″ | 6 | 8.5″ x 11″ |
4″ x 5″ | 4 | 8.5″ x 11″ |
2.5″ Round Circle | 12 | 8.5″ x 11″ |
1.67″ Circle | 24 | 8.5″ x 11″ |
2″ x 2″ Square | 20 | 8.5″ x 11″ |
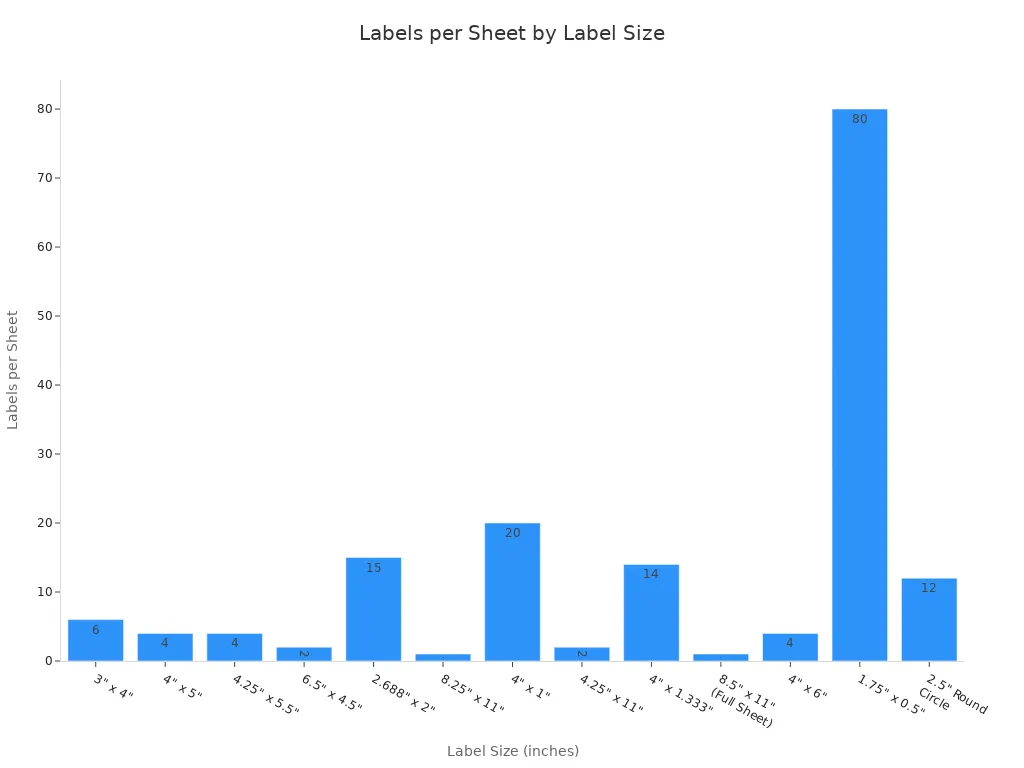
You can make stickers in any size or shape you want. Special shapes may need kiss-cut or die-cut methods. These help make smooth edges but can waste more material. Picking a good layout saves paper and makes printing easier. Strong vinyl helps stickers last longer, especially if they are glossy and waterproof.
Making Your Stickers Unique
To make your stickers special, use bright colors, clear fonts, and fun shapes. Colors like blue and yellow stand out. Big, bold letters are easy to read from far away. Adding a logo or picture gives your sticker a main focus. Some people add QR codes or messages to get more attention.
Branding is important in sticker design. Using the same colors and logos helps people remember your brand. Simple designs make your message clear. Glossy sticker printing lets you pick shiny or soft finishes. Glossy stickers look bright and shiny. Matte stickers feel soft and not shiny.
Printing companies can make special shapes and finishes. They can do things like die-cut, holographic, or metallic stickers. These options help your stickers look cool and last longer.
Print Glossy Stickers at Home

Printer Settings
Picking the right printer settings helps you get great stickers. Most printers have “Best Quality” and “Glossy Paper” modes. These settings change how much ink is used and how it goes on the paper.
Here are some steps to help your stickers look better:
Pick the right paper type in your printer menu. Use “cardstock” for glossy vinyl sticker paper. This works better than “plain paper” or “glossy” settings.
If the ink smears or looks wet, lower the print quality or DPI. Lower DPI stops too much ink from soaking the paper.
Turn off borderless printing. This keeps ink from running off the edges or making things crooked.
For black ink, turn on “Print as Image” in the print box. This makes the print look sharper and clearer.
Epson printers work best with “high speed” mode. This stops too much ink from soaking in.
Canon Pixma printers can smear ink on glossy settings. Pick “Hagaki” as the paper type. It acts like cardstock and helps stop smears.
Laser printers can print glossy stickers too. Only print up to 10 sheets at a time to avoid heat damage.
DPI means dots per inch. It affects how sharp and clear your pictures look. Higher DPI, like 300 or more, makes prints look sharp and detailed. This is important for custom glossy stickers, especially with small text or thin lines. High DPI gives you bright colors, clear words, and sharp pictures on glossy sticker paper.
Tip: Make your design files at least 300 PPI. Save them as PDF, PNG, or TIFF. This keeps your colors and details looking good.
Printing Process
Printing on glossy vinyl sticker paper takes careful steps. Here is what you need to do:
Make your design file high resolution (300 PPI) and use RGB colors for inkjet printers.
Pick glossy vinyl sticker paper that fits your printer.
Set your printer to “Glossy Paper” or “cardstock” mode for best results.
Print a test page to check colors and alignment.
Print your stickers and let the ink dry for 15-20 minutes. This stops smudges and helps stickers last longer.
You can add a clear sheet or spray for extra protection.
Cut out the stickers with sharp scissors, a craft knife, or a cutting machine with marks.
Clean your printer often to stop dust and jams.
Keep sticker paper in a cool, dry place. The room should be between -18°C and 50°C for best results.
Sometimes, printing mistakes happen. The table below shows common problems and how to stop them:
Common Printing Errors on Glossy Sticker Paper | Prevention Methods |
|---|---|
Smudging or ink bleeding due to handling before ink dries | Let ink dry all the way before touching; do not touch right after printing |
Faded or dull colors caused by incorrect printer settings | Use high-quality print mode; pick the right paper type; use pigment inks for strong color |
Uneven ink coverage from improper paper feeding | Load paper with glossy side up; make sure paper feeds right |
Ink bleeding or wrinkling from excessive ink or heavy pressure | Only print once; do not press hard when feeding paper |
Difficulty peeling backing paper | Use a craft knife or card to start peeling; use tape to remove sticky bits; cut stickers before peeling |
Sticker curling or loss of adhesiveness over time | Store stickers in a cool, dry place away from heat and water |
Additional protection | Use laminating sheets or clear sprays to keep stickers safe from water, scratches, and fading |
Note: Always do a test print before making lots of stickers. This helps you find problems early and saves time and paper.
Adding Glossy Finish
A glossy finish makes stickers look shiny and professional. Glossy finishes use shiny covers that make colors pop and look deeper. Both glossy and matte stickers use strong vinyl and weatherproof covers. Glossy finishes help stickers last longer in wet places like bathrooms or kitchens.
The table below shows how glossy finish methods compare for durability:
Aspect | Glossy Finish Method | Durability Characteristics |
|---|---|---|
Method | Put on a shiny, reflective cover or laminate | |
Visual Appeal | Makes colors look deeper and brighter, gives a shiny look | Glossy surfaces can glare and show fingerprints easily |
Durability | Stays safe from water and scratches better than matte | Great for wet or humid places like bathrooms and kitchens |
Practical Considerations | Takes longer to make, not easy to write on | Needs cleaning often to look nice because of smudges |
Lamination puts a clear layer over the printed vinyl. This layer keeps waterproof glossy stickers safe from weather, scratches, sun, and dishwashers. Lamination protects the sticker from water, heat, and rubbing. This makes glossy stickers more waterproof and dishwasher-safe.
Tip: Use laminating sheets or clear sprays for extra safety. These help stickers last longer and keep colors bright.
Glossy and matte stickers each have good points. Glossy stickers are shiny, bright, and protect well from water. Matte stickers do not show fingerprints or smudges as much. This makes them good for things people touch a lot. For outside or busy places, glossy stickers with lamination stay bright and strong for years.
Cutting and Finishing
Cutting Methods
Picking how you cut your stickers changes how they look. Scissors and craft knives are good for beginners or small amounts. Electronic cutting machines, like Cricut or Silhouette, make stickers look very neat. These machines are best if you want the same shape every time.
The table below shows the good and bad things about each tool:
Tool Type | Advantages | Disadvantages |
|---|---|---|
Scissors | Cheap, easy to use, good for small shapes and corners. | Can get sticky, not great for hard shapes, slow for many stickers. |
Craft Knives | Very exact, good for tiny designs, blades can be changed. | Blades break, need to be careful, new blades can be hard to find. |
Cutting Machines | Makes perfect cuts, does die-cut and kiss-cut, great for lots of stickers or tricky shapes. | Costs more, needs setup and a computer, not easy to move. |
Cutting by hand is best for easy shapes or just a few stickers. Machines are better for fancy shapes or lots of stickers. They help your stickers look shiny and neat, like store-bought ones.
Clean Edges and Durability
Smooth edges help stickers look nice and last longer. Here are some ways to do this:
Use sharp scissors and cut slowly. Turn the paper to make smooth curves.
Use cuticle scissors for tiny or tricky spots.
Try an X-Acto knife and a round object for perfect circles.
Use a hole punch for neat holes in the middle.
Put clear tape or laminate on stickers before cutting. This keeps edges safe and makes them shiny.
For the best look, use a cutting machine for custom glossy sticker printing.
To make stickers last longer:
Use pigment ink so water does not ruin your stickers.
Let the ink dry all the way before touching.
Add a clear sealant or laminate to stop water, sun, and scratches.
These steps help stickers stay bright and shiny. They are good for comparing glossy vs matte stickers.
Storage Tips
Storing stickers the right way keeps them looking new:
Keep stickers flat in their package, away from sun and heat.
Store stickers in a cool, dry place (62–77°F) with little moisture.
Use UV lamination or spray to stop fading.
Clean stickers gently with a soft cloth and mild cleaner.
Peel stickers off the backing with the grain so they do not curl.
Heat, wet air, and sunlight can make stickers fade, curl, or lose their stickiness. Storing them right helps durable glossy stickers and waterproof glossy stickers stay bright and ready to use.
Printing your own glossy stickers at home takes a few steps:
Make your design at 300 PPI using RGB colors.
Pick sticker paper and printer settings that work well together.
Let the stickers dry for 15–20 minutes before you cut them.
Use sharp scissors or knives for smooth edges. Laminate stickers if you want them to be waterproof.
Keep stickers in a cool, dry spot so they last longer.
Try different materials and finishes to see what works best. Beginners learn by making mistakes and get better with practice. DIY sticker printing is good for small projects. If you need lots of stickers, businesses should use professional printing for better quality. Go to the website for quick quotes and more choices.
FAQ
What is the difference between glossy and matte stickers?
Glossy stickers are shiny and make colors look bright. Matte stickers look soft and do not shine. Many people pick glossy for bold designs. Matte is good for a calm look.
Both types last longer if you laminate them.
How can someone make waterproof glossy stickers at home?
Use waterproof vinyl sticker paper and pigment ink. Add a clear laminating sheet or spray on top. This keeps the sticker safe from water and fading.
Are homemade glossy stickers as durable as store-bought ones?
Homemade stickers can last a long time. Good vinyl, pigment ink, and lamination make them strong. These glossy stickers can be as tough as store-bought ones.
What printer works best for custom glossy sticker printing?
Inkjet printers with dye or pigment ink work best. Canon PIXMA and Epson EcoTank are good choices. Always check if your printer fits the sticker paper.
Can someone write on glossy stickers?
It is hard to write on glossy stickers. Most pens and markers will smear. Use a permanent marker for best results.
Matte stickers are easier to write on than glossy ones.