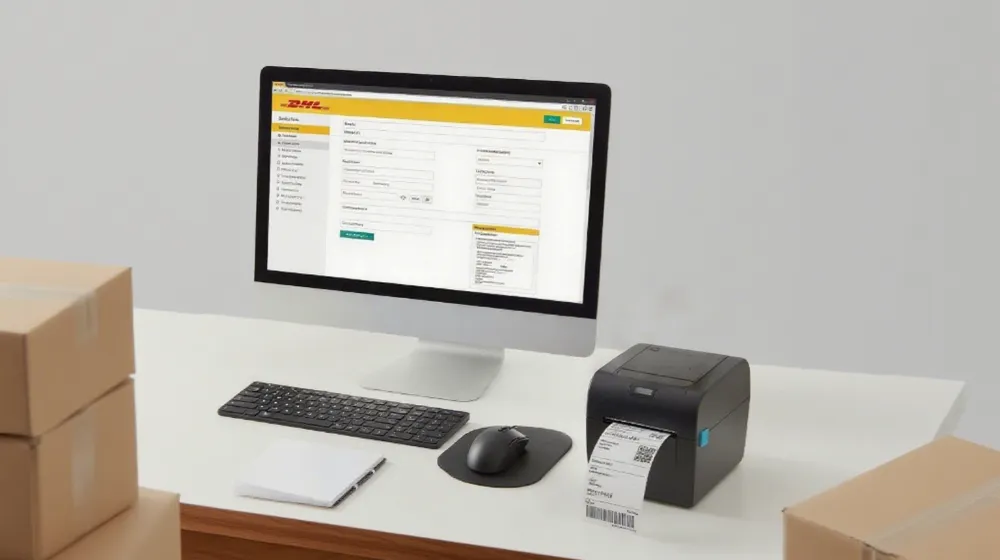
Creating a DHL shipping label online with MyDHL+ helps make shipping faster and easier.
Correct sender and receiver details help packages arrive on time and stop mistakes or late deliveries.
Right package details help customs go smoothly and make sure shipping costs are fair.
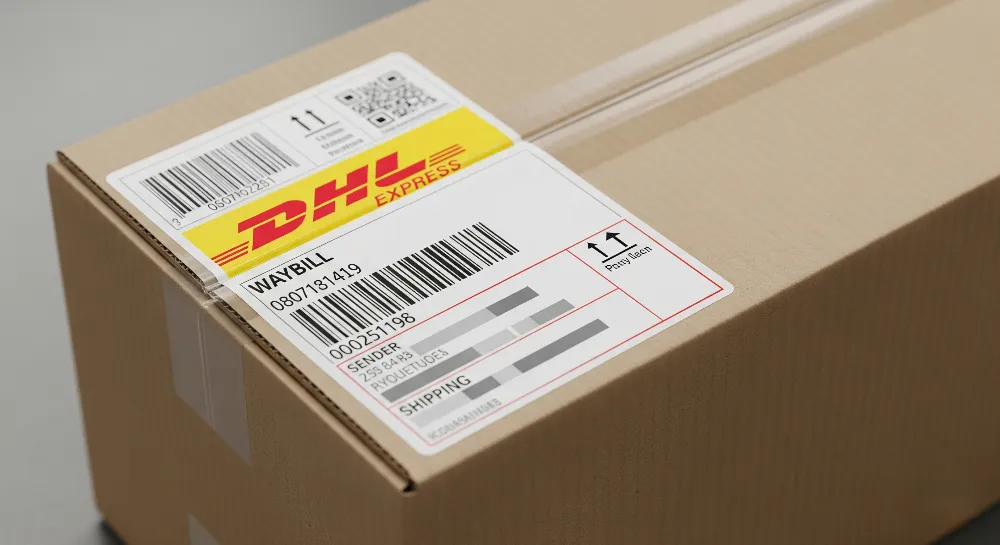
Shipping labels have important info, like addresses and barcodes, to help track packages and follow rules.
Using a thermal printer, such as ones from Thermalabels, makes printing better and quicker for every Create DHL Label job.
Key Takeaways
Make sure you type the right sender and receiver details. This helps stop delivery delays and customs issues. Use a good printer to print the shipping label. A thermal printer works best. It makes the label clear and hard to smudge. Put the shipping label on a flat and clean spot. Make sure it is easy to see. Place it on the biggest side of the package. Check all shipment and customs details again before you make the label. This helps you avoid mistakes. After you print the label, schedule a pickup or drop off your package at a DHL Service Point. This makes shipping easier.
Access MyDHL+ Account
Log In or Sign Up
To use DHL Express, you need a MyDHL+ account. If you already have one, log in with your email and password. If you are new, you must sign up first. You need a real email and a strong password to register. MyDHL+ uses DHLPass for extra security. DHLPass sends a one-time password (OTP) to your phone or email. Each phone number can only be used for one account. If you enter the wrong OTP too many times, your account will lock. If you do not get the OTP, check your spam folder.
Tip: DHL Express uses strong security steps. Keep your login safe. Do not share your account with others. Sharing can cause more security checks.
DHL Express keeps your personal data safe. They follow GDPR and other laws. They only use your information for real reasons, like keeping your account safe.
First-time users may face these problems:
Shipping account numbers that are not valid or not checked
Address lines that are too long, over 45 characters
Missing details about what is in the shipment
Wrong destination or using letters that are not Latin
Some places may not have service for shipping
Pickup booking errors if connections do not match
Customs mistakes, like missing country or value
API credentials that are not turned on
Errors like “No rates found” or “Error 400” when making a shipment
Navigate to Create Shipment
Once you log in, you can start a new shipment. Here are the steps:
Go to the MyDHL+ website and log in or use guest mode.
Pick your current country.
Click “Create a New Shipment” to start.
Choose the import country and type the state.
Pick the destination country and type its state.
Click “Next” to move on.
Fill in the pickup address and contact info.
Fill in the drop-off address and contact info.
DHL Express makes it simple to create shipments for local or international delivery. Always check your details to avoid mistakes and help DHL Express process your shipment smoothly.
Enter Shipment Details
Sender and Recipient Info
Getting sender and recipient info right is very important. DHL Express needs these details for smooth delivery and customs. The system will ask you to fill in these required fields:
Name
Company
Address
Email Address
Phone Number
DHL Express uses this info to make a shipping label. They also use it to contact the sender or receiver if needed. Check every entry for spelling and make sure nothing is missing. Wrong or missing info can slow down or stop your delivery.
Tip: Always check addresses and phone numbers before you go on. Use the full company name. Do not use short forms. This helps avoid mix-ups during shipping.
Package and Customs Details
You must describe what is in the package and give customs papers for international shipments. DHL Express asks you to say what kind of package it is, how much it weighs, and its size. For shipments going to other countries, customs needs a Commercial Invoice and other papers.
Required customs information includes:
Official company letterhead
Sender’s full name and address, including postal code
Sender’s telephone, fax or mobile number and VAT number
Receiver’s complete address details, including telephone, fax or mobile numbers
Invoice date
Waybill number
DHL as the carrier
Shipper’s invoice number
Sender’s reference
Recipient’s reference
Total quantity for each item
Country of origin for each item
Full description of the goods
Customs commodity code (HS code) for each item
Unit weight
Unit value of each item
Subtotal of each item
Net weight for the shipment
Shipment gross weight
Total number of shipment pieces
Total value and currency of the shipment
Freight and insurance charges
Other charges
Currency code
Total invoice amount
Type of export (permanent, temporary, repair)
Terms of sale / trade (Incoterms®)
Reason for export
Additional notes
Complete declaration with name and company title
Signature
Company stamp (if required)
Customs brokers use this info to fill out forms and figure out taxes. DHL Express says to use the MyGTS platform to check rules and help with paperwork.
Note: Good packaging keeps your shipment safe from damage. Use strong boxes and pack items tightly. If you ship hazardous goods, follow DHL rules for labels and packing. You can find customs forms and guides on the DHL website or in MyDHL+ when you make your shipment.
Create DHL Label
Review and Confirm Details
Before making a DHL label, users need to check all shipment info in MyDHL+. Checking details stops delivery problems and customs trouble. The site shows a summary of sender and receiver info, package details, and customs papers. Users should look for spelling mistakes, missing numbers, and correct country codes.
Common errors during review include:
Recipient address is wrong, like missing street numbers or ZIP codes.
Billing country does not match where the shipment starts.
Service type is not available for the chosen DHL Express service.
Tax ID type is wrong and must be VAT or EORI.
Address is missing details, like apartment numbers.
Customs papers have mistakes, like missing values or wrong item descriptions.
Tip: Users can use DHL’s address check tool to make sure recipient info is right. Checking every field helps stop mistakes and customs delays.
Calculating Shipping Costs and Payment Options
MyDHL+ figures out shipping costs by package weight, size, destination, and DHL Express service. The site gives a cost estimate before users make their DHL label. Users can look at prices for different service levels, like Express Worldwide or Economy Select.
Service Type | Delivery Speed | Typical Use Case | Cost Range |
|---|---|---|---|
Express Worldwide | Fastest | Urgent international | Higher |
Economy Select | Standard | Less urgent shipments | Moderate |
Users can pay with credit card, PayPal, or business account billing. Non-business users pay with credit card. Business users can use their DHL account for bills. MyDHL+ shows the total cost and asks users to enter payment info safely.
Note: Users should check the payment method before going on. The system will not make the DHL shipping label until payment is finished.
Generate DHL Shipping Label
After checking all info and paying, users can make their DHL label in MyDHL+. The site makes an air waybill, which is the official shipping label for DHL Express.
Step-by-step process to create your DHL air waybill:
Click “Create a New Shipment” in MyDHL+.
Type in origin and destination countries, sender and receiver contact info.
Pick shipment type: “Documents” or “Packages.” For packages, describe items, enter commodity codes, amounts, and values.
Upload or make customs invoice, including invoice number and references.
Choose packaging type, amount, weight, and size.
Set payment method and shipping date. Pick the DHL Express service you want.
Add extra services, like GoGreen Plus or signature needs.
Upload customs papers online.
Check shipment summary, confirm cost, and finish payment.
Get tracking number and make the DHL shipping label and air waybill.
Print or email the label and customs invoices. Send emails to sender and receiver.
Label format options:
Users can pick PDF formats, like A4 or 4×6 inches, for their DHL label.
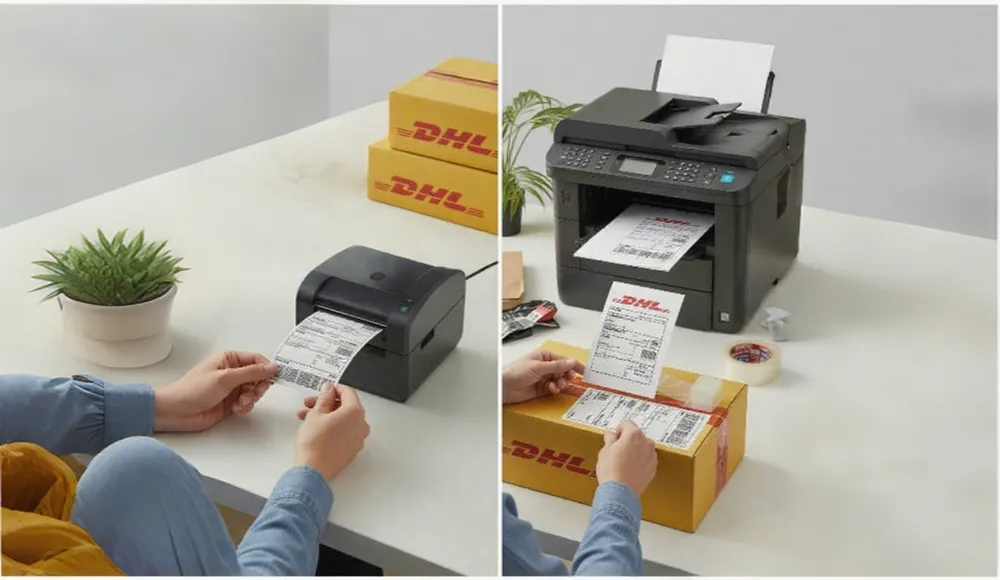
Thermal printers make labels strong and hard to smudge, good for eCommerce shipments.
Always print labels at full size (100%) so barcodes are not messed up.
Make sure the print is clear for easy scanning.
Do not fold or damage the label so the barcode can be read.
Tip: Users should stick the DHL shipping label on the top of the package. Do not put tape or other labels over the barcode. For extra safety, put a copy of the air waybill inside the box.
By doing these steps, users can make DHL label quickly and follow DHL Express rules. Checking info, figuring out costs, and picking the right label format help stop shipping mistakes and delays.
Print DHL Shipping Labels
Print at Home or Office
Many people print dhl shipping labels at home or work. This is fast and easy. You can use a desktop printer, like laser or inkjet. These printers work with half-sheet or full-sheet shipping labels. Pick the right label format, like PDF 4×6 inches or A4, when you download from MyDHL+. Always print at 100% size so the barcode stays clear.
Tip: Use good label sheets. Do not use normal paper. Regular paper can rip or smudge during shipping.
If your label looks blurry or the barcode is hard to read, check your printer settings. Set the print quality to “Best” or “High” for better results. If you print dhl shipping labels a lot, a thermal printer works better and faster.
Use Thermal Printer
Thermal printers give the best results for shipping labels. They use heat-sensitive labels, so you do not need ink or toner. The labels do not smudge and are ready to use. DHL likes 4×6 inch labels, which fit most direct thermal printers.
Recommended Thermal Printers for DHL Shipping Labels:
Printer Model | Printer Type | Label Size Compatibility | Key Features Relevant to DHL Labels |
|---|---|---|---|
Dymo LabelWriter 5XL | Direct Thermal | 4″ x 6″ and 4″ x 8″ | No ink/toner, fast printing, smudge-proof, BPA-free labels |
Rollo USB Printer | Direct Thermal | 4″ x 6″ | Ink/toner free, high speed, compatible with major shipping platforms |
Brother TD-4210D | Direct Thermal | 4″ x 6″ | Compact, reliable, USB/serial connectivity, low maintenance |
Citizen CL-E300XUBNNA | Direct Thermal | 4″ x 6″ | Fast printing, multiple connectivity options, durable design |
Thermal printers like the Brother TD-4210D and Citizen CL-E300XUBNNA are good for lots of shipping. They print fast and make labels that do not smudge. You can connect these printers with USB, LAN, or Wi-Fi.
Steps to Print DHL Shipping Labels with a Thermal Printer:
Pick a thermal printer that uses 4×6 inch labels.
Put heat-sensitive label rolls in the printer.
Install the right drivers and connect the printer to your computer.
Download the DHL shipping label in PDF or ZPL from MyDHL+.
Open the label file and pick the thermal printer to print.
Set the print size to 100% and pick the right label direction.
Print the label. It will not smudge and is ready to use.
Note: Only use labels made for thermal printers. Regular paper or inkjet labels may not work and can jam or print badly.
Recommended Thermal Printer Settings for Optimal Print Quality
To make sure every DHL shipping label scans well, change your thermal printer settings like this:
Resolution: Set to at least 203 dpi for clear barcodes and text.
Darkness: Use medium or default. Too dark can make barcodes bleed. Too light can make them hard to read.
Label Size: Make sure the printer is set to 4×6 inches (or 100mm x 150mm). This is DHL’s favorite size.
Print Speed: Use a medium speed for good quality and speed.
Tip: Print one test label before printing many. Check that all barcodes and words are sharp and easy to scan.
Print at DHL Service Point
Some people do not have a printer. DHL Service Points can help. You can go to a DHL location and ask staff to print dhl shipping labels for you. Bring the label file on a USB drive or show the QR code from MyDHL+. Staff will print the label using their special printers.
Note: Printing at a DHL Service Point makes sure the label is good quality. This is a good choice if you ship sometimes or do not have a printer.
Troubleshooting Common Printing Issues
Printing problems can slow down your shipment. You might see blank labels, bad barcodes, or software errors. Try these steps to fix most problems:
Get the newest Adobe Acrobat Reader for better PDF files.
Set your browser to download PDF files and open them with a PDF viewer.
If you see blank labels, try a different browser or device.
If problems keep happening, contact DHL support or use “Submit Ticket” in MyDHL+.
Common Issue | Explanation | Recommended Troubleshooting Step |
|---|---|---|
Blank or blurry labels | PDF not showing right | Use Adobe Acrobat Reader or another PDF viewer |
Label size incorrect | Printer settings do not match label format | Set printer to 4×6 inches and print at 100% size |
Barcode not scanning | Low print quality or smudged label | Make print clearer, use thermal labels, do not use inkjet if smudging |
Printer not recognized | Driver or connection problem | Reinstall drivers, check USB or Wi-Fi connection |
Tip: Always check the label after you print. Make sure the barcode is clear and the words are easy to read. A good shipping label helps DHL deliver your package on time.
Attach Shipping Label
Placement on Package
Putting a DHL shipping label in the right spot helps your package get delivered correctly. The label must be easy to see and scan the whole time it ships.
Here are some simple steps to follow:
Put the shipping label on a flat, clean spot. Do not let it fold or cover it with tape.
Use the biggest side of the box. This makes it easier to see and scan.
Keep the label away from corners and seams. These spots can get damaged.
Wipe the box to remove dirt or dust. This helps the label stick better.
Press down on the label so it stays on tight. Smooth out any bubbles.
Try not to touch the sticky part. This keeps the label strong.
Tip: Always use a thermal label for best results. Thermal labels do not smudge or tear, so barcodes scan well.
📦 Putting the label in the right place helps stop delays or lost packages.
A label in the right spot helps DHL workers and machines scan it fast. This makes sorting and delivery go quicker.
Remove Old Labels
Old labels can confuse workers and cause mistakes. Always take off old labels before you put on a new one.
Peel off all old labels and stickers. Make sure no old barcodes or addresses show.
Never use a shipping label again. Each label is only for one package.
If a label prints wrong or gets ruined, throw it away and print a new one. Do not try to fix or change it.
Clean the box after you take off old labels. This stops dust from making the new label fall off.
Use clear sleeves if you need to. These keep the label safe from water or damage.
Note: Taking off old labels helps stop scanning mistakes and lost packages. DHL needs clear labels to deliver packages the right way.
A clean box with just one label helps your package get to the right place without problems.
Schedule Pickup
Book Courier Pickup
After you print the DHL shipping label, you can set up a pickup with MyDHL+. This lets a DHL driver come to your place and get your package. Here are the steps to book a pickup:
Go to ‘Schedule a Pickup’ on MyDHL+.
Pick the choice that says you have a DHL waybill number.
Type in the waybill number and give contact info for the person sending the package.
Write the pickup address and pick the spot for pickup.
Add special notes, like asking for a DHL box or telling which door to use.
Pick how you want to pack:
If you use your own box, say how many boxes, their weight, and size.
If you use DHL boxes, say how many and what kind.
Choose the pickup date and pick a time that works for you.
Check all the info and finish the pickup request.
Print the waybill and any needed invoices for the DHL driver.
Tip: Using MyDHL+ to schedule a pickup lets you pick the best time and packing. You can write notes for the driver to help make things easier.
Drop Off Options
Some people like to drop off packages instead of waiting for pickup. DHL has different places where you can drop off packages with a label already printed:
Pick ‘Drop off at DHL Service Point’ when you set up your shipment.
Decide if you want to print the label at home or at the DHL Express Service Point.
If you want to print at the service point, pick the ‘Accept QR code’ option for easy printing.
Use the search tool to find a DHL Express Service Point close to you.
Check the place you picked and finish dropping off your package.
Note: Dropping off your package at a DHL Service Point can save you time if you are busy. The workers there can help print your label and make sure it is right for DHL.
By doing these steps, you can pick the easiest way to send your DHL package. You can choose to have it picked up or drop it off at a local place.
DHL Return Label
Create Return Label
Many businesses and customers need a return label to send products back. MyDHL+ makes it easy to create a DHL return label. You can make return labels by hand or set up the system to do it for you.
To make a DHL return label by hand:
Go to Orders in MyDHL+.
Start a return order. Use the warehouse as the sender and the customer as the receiver.
Pick the right courier service.
Print or email the return label to the customer.
To make return labels automatically, set up rules in MyDHL+:
Go to Settings and click Rules.
Add a rule. Set it for “All Orders” and choose to make return labels.
Run the rules or re-import orders to add the return label flag.
Turn on return labels for all outgoing packages. Go to Settings > Couriers > DHL Express > Settings > Advance, then check the box to make a return label for every package.
Tip: Making return labels automatically saves time. It also makes sure every package has a return label.
Print or Share Return Label
After you make a DHL return label, you can give it to customers in different ways. Each way has its own good points for ease and being eco-friendly.
Common ways to print or share a DHL return label:
Email a digital copy or use a returns portal. Customers can print the label at home. This is easy for businesses but not for customers without printers.
Put a prepaid return label in the first package. This helps customers who cannot print, but some labels may not get used.
Give a QR code for the return label. Customers can go to a DHL place, scan the code, and print the label there. This is good for the planet and simple, but not every place has this.
Note: Giving more than one way to get a return label helps customers. It also makes returns go smoothly.
Label Accuracy
Double-Check Information
Making sure your shipping label is right helps DHL deliver fast and safe. Every part of the label is important. Before you finish a DHL shipping label, use a checklist to stop mistakes.
Check the shipper’s name, phone, email, and full address.
Make sure the receiver’s name, contact, phone, email, and address are correct.
Look at the payer account number. It must be right.
Check the shipment’s weight, size, and what is inside.
The barcode must show clearly. It cannot be covered or broken.
Write who pays duties and taxes the right way.
Add Tax ID for sender and receiver if shipping to another country.
Look at the air waybill for spelling mistakes or missing info.
Use good scales and rulers for weight and size.
If you can, ask someone else to check the label too.
Tip: MyDHL+ has digital tools to help make air waybills. These tools help stop mistakes. Having another person check can find errors you missed.
Common Mistakes
Mistakes on shipping labels can slow down or lose packages. They can also cause customs problems. Knowing the most common mistakes helps you avoid them.
Return or destination address is missing or wrong
Package description is not complete or not right
Number of items or sizes is wrong
Weight for the package or items is missing or wrong
Tracking number or barcode is missing or not right
Service type is wrong (Standard, Priority, Express)
Unidirectional codes are missing
Routing numbers are not right
Postal barcodes are missing
Special instructions are not there
Error Type | Possible Impact |
|---|---|
Wrong address | Package lost or delayed |
Bad barcode | Tracking failure |
Incomplete description | Customs delays |
Missing instructions | Mishandling or misrouting |
📦 Customs may open packages with wrong labels. This can slow things down or cause damage. Asking shipping experts and using MyDHL+ can help stop these problems.
Checking your label carefully helps your package ship smoothly and keeps it safe from problems.
Troubleshooting
Label Generation Issues
Sometimes, making a DHL label does not work because some info is missing or wrong. Users see errors if they forget to fill in all the needed shipment details. For example, if there is no tracking number or if customs forms have mistakes, the label will not be made. If an address line is too long, this can also cause trouble. DHL does not allow address lines over 40 or 50 characters. Users need to make them shorter or use more than one line.
Some common problems when making labels are:
Account number must be 14 digits. If not, it will not work.
Shipping to Packstation needs a special format and no company name.
Return labels do not work if return setup is missing.
Pickup booking fails if test info or wrong places are used.
If tracking codes are used twice, DHL support must help.
Recipient reference codes, like Postnummer, need to be checked with the receiver.
Old login info stops tracking. Users must update it with DHL.
Sometimes, the server has problems. Waiting and trying again can fix it.
DHL rounds up weights under 0.1 kg to the lowest allowed.
Issue | Explanation | Resolution |
|---|---|---|
Needed info is not filled in | Add all needed info | |
Address line too long | Too many letters in address | Make address shorter or split it |
Missing company name | Ship From address has no company name | Add company name |
Unsupported return labels | Some addresses cannot use return labels | Do not use return label |
Service/package mismatch | Service does not match package info | Change package info |
Tip: Always check every box before making a label. This helps stop mistakes and saves time.
Printing Problems
Printing DHL shipping labels can have problems too. Sometimes, labels look blurry, printers go offline, or the label size is wrong. If the barcode is blurry, scanners cannot read it. This can slow down delivery. If the printer loses its connection, it will not print. If you print a 4×6 inch label on A4 paper, the barcode and address can get messed up.
Blank labels can happen if the PDF viewer does not show the file right. Sometimes, the printer driver is old or does not work with the label. Labels printed on normal paper can rip or smudge during shipping.
To fix these problems, users should:
Set the printer to “Best” or “High” for clear barcodes.
Make sure the printer is set to the right label size, usually 4×6 inches.
Use thermal printers so labels do not smudge.
Update printer drivers and reconnect printers that go offline.
Open label files with a good PDF viewer, like Adobe Acrobat Reader.
Problem | Cause | Solution |
|---|---|---|
Blurry label | Print quality is too low | Use higher print quality |
Offline printer | Printer lost connection | Reconnect or restart printer |
Incorrect label size | Printer settings are wrong | Pick the right label size |
Blank label | PDF viewer problem | Use new PDF software |
Note: Always look at the label after printing. Make sure barcodes and addresses are easy to see. This helps DHL deliver your package without trouble.
Making and printing a DHL shipping label has a few main steps. First, type in the sender and receiver’s correct details. Next, use a good printer or a thermal printer so the label is clear and does not smudge. Then, stick the label tightly on the biggest, flattest part of your box. Always check all the details again before you send the package. After you print the label, you can set up a pickup or take the box to a drop-off spot. If you need help, DHL has online tools you can use:
DHL Resource | Key Features |
|---|---|
MyDHL+ | Make labels, track shipments, watch video guides |
Get help and track packages any time, day or night |
Following these steps helps your package ship safely and on time every time.
FAQ
How does someone track a DHL shipment after creating a label?
The shipping label has a tracking number. Users type this number on the DHL tracking website. The website shows where the package is and if it was delivered.
Can a person use their own box for DHL shipments?
DHL lets people use their own boxes. The box must be strong and not broken. Good packaging keeps things safe during shipping.
What should a user do if the DHL label prints incorrectly?
If the label is blurry or the barcode is hard to read, print it again with better settings. Try another printer if needed. If it still does not work, ask DHL support for help.
Does DHL offer signature confirmation for deliveries?
DHL has signature confirmation as an extra service. Customers can pick this when making a shipment. The person getting the package must sign for it. This makes delivery safer.
What happens if a user enters the wrong address on the label?
A wrong address can make the package late or lost. Users should call DHL customer service right away. They can fix the address before the package leaves.