Anyone can create custom labels for products by following a few simple steps. People want labels that help their products stand out, provide important information, and build a strong brand identity. Many people choose to create custom labels because they want to:
Make products special and easy to find in stores.
Use unique shapes, colors, or finishes to catch the eye.
Benefits of Custom Labeling | |
|---|---|
Food and Beverage Products | Stand out on shelves, comply with regulations, share ingredients and allergy info. |
Cosmetics and Personal Care | Highlight benefits, attract buyers, use waterproof or premium finishes. |
Health and Wellness Products | Build trust, provide safety information, display certifications. |
Wine, Spirits, Specialty Drinks | Convey quality, origin, and use special designs for collectors. |
Pharmaceuticals and Medical Products | Ensure labels are safe and easy for everyone to read. |
Anyone interested in how to create custom labels can feel confident about the process. These steps are effective for beginners and small business owners alike.
Key Takeaways
Pick the best tools like online editors, software, or label makers. These help you make labels easily and fit what you need.
Choose a template that fits your product’s shape and size. Change it by adding your brand colors, fonts, and logo.
Print labels at home if you only need a few. Use professional printing if you want better quality or need many labels.
Put labels on clean, dry surfaces so they stick well. This helps stop bubbles and peeling. Test your labels before printing a lot.
Use strong materials and keep your design simple. Test your labels to save money and help your products stand out.
Tools for Labels
Picking the right tools makes label making simple. People can use online tools, software, or label maker devices. Each tool has good points. Users can pick what works best for them.
Online Tools
Online label tools help people start fast. Many have templates and drag-and-drop features. You can upload your logo easily. Here are some popular tools:
Tool Name | Key Features | Pros |
|---|---|---|
Automates label generation, drag-and-drop editor, PDF/image output, supports integrations | User-friendly, flexible, great for automation | |
Canva | Many templates, drag-and-drop, large graphics library, logo upload | Beginner-friendly, real-time collaboration, free plan |
Templates for Avery sheets, customizable text/images/barcodes, batch data import | Seamless Avery compatibility, browser-based, free | |
OnlineLabels.com | Templates for their products, barcode/QR code generator, batch printing | Simple to use, supports layered designs, free with label purchase |
Adobe Express | Professional templates, customizable design, Creative Cloud integration | High-quality tools, user-friendly, free plan available |
Labeley | Pre-designed templates, graphics/icons, image upload, food/beverage focus | No registration needed, simple interface, free basic use |
StickerYou | Many shapes/sizes, high-quality printing, wide template selection | Professional print quality, no minimum order, free to design |
Microsoft Office | Templates in Word, Excel integration for mail merges | Familiar interface, free with Microsoft account, good for simple and complex projects |
Most online tools let you upload logos and use brand colors. You can see your design before printing. Canva and Avery Design & Print have free plans. Some features or templates may cost more. Microsoft Word is part of a paid package. Adobe Creative Suite costs more for advanced features. Free tools like Canva and Avery help beginners start designing without spending a lot.
Tip: Online tools can work with Google Docs. This makes it easy to add product info or work with a team.
Software Options
Some people like using software they can download. These programs give more control and extra features. Software like Microsoft Word, Adobe Creative Suite, and Label LIVE allow detailed changes and batch printing. Here is a quick look:
Tool / Aspect | Advantages | Disadvantages |
|---|---|---|
Label LIVE (Software) | Efficient batch printing, WYSIWYG designer, spreadsheet integration | Manual label size adjustments, unclear error messages |
Avery Design & Print | Quick setup, easy formatting, intuitive workflow | Limited design flexibility, fewer advanced editing tools |
MarkMagic (Online) | Runs in browser, no installation, accessible from any device | Outdated UI, slow barcode generation, formatting challenges |
Loftware Cloud (Online) | Easy to use, scalable, drag-and-drop design, barcode addition, multi-printer support | Occasional bugs, complex setup, inconsistent field sizing |
Software is good for people who want more options or need to print many labels. Online tools are easy to use from any device. But they may not have as many design choices or may have bugs sometimes.
Label Makers
Label maker devices let people print labels at home or work. These machines are great for small businesses or quick jobs. Here is a table with some top label makers:
Label Maker Device | Key Features & Benefits | Best For | Power Source | Max Label Width | Price Range |
|---|---|---|---|---|---|
Brother P-Touch PT-D220 (Best Overall) | Variety of fonts, waterproof labels, easy to use, preview before printing | Desktop or portable use, first-time users | AC adapter | 0.50 inches | Under $40 |
Brother P-Touch PT-H103W (Best Value Handheld) | Lightweight, handheld, borders and pictographs, supports 4 languages | On-the-go labeling in retail | 6 AAA batteries | 12 mm | Under $30 |
NIIMBOT B1 Label Maker (Best Features) | Color printing, wider labels, customizable templates, app connectivity | Branded, colorful labels | Rechargeable battery | 2 inches | $25-$40 |
Brother P-Touch Business Professional Connected | Bluetooth, QWERTY keyboard, various sizes, desktop use, app available | Professional business environments | Plug or 4 C batteries | 1 inch | $100-$115 |
Most label makers are easy to use and make clear labels. Devices like DYMO Label Manager 420P and Brother P-Touch Cube Plus PT-P710BT are simple to set up. They make strong, easy-to-read labels. The chart below shows how easy and fast these label makers are to use:
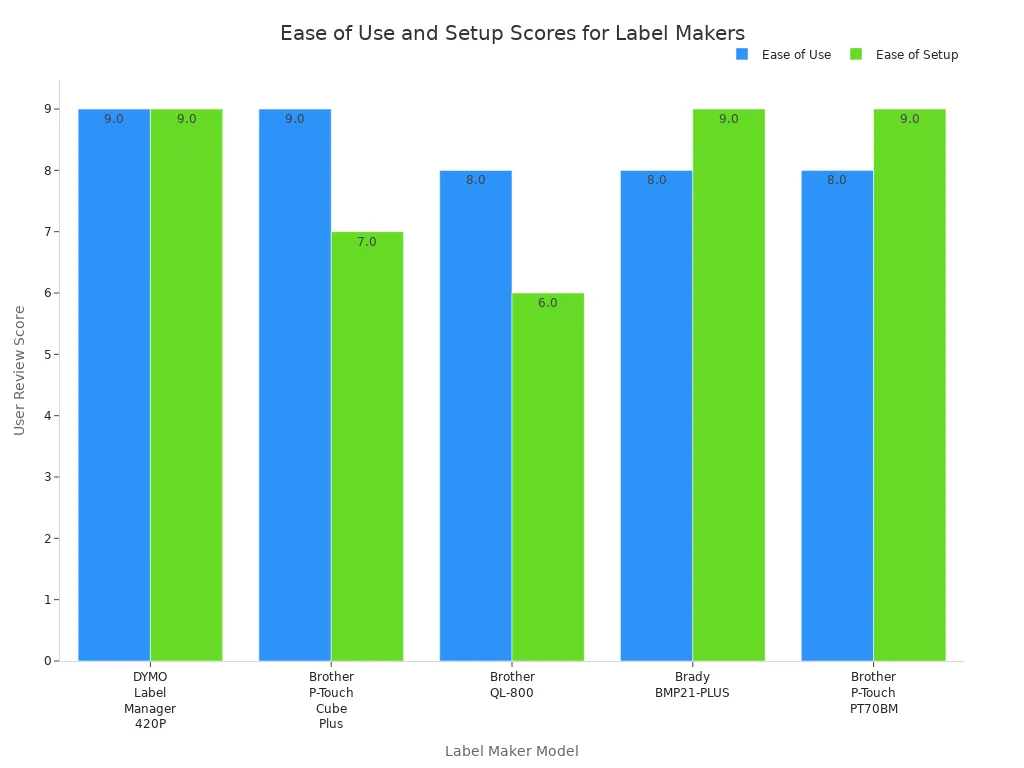
People can pick a label maker based on price, label size, and features. Some want Bluetooth or color printing. These machines help anyone make nice labels for products, storage, or shipping.
How to Make Labels: Steps
Making custom labels can seem hard at first. But if you break it into steps, it gets much easier. Anyone can follow these steps to make cool labels. These labels look nice and help products stand out.
Choose a Template
Start by picking a template that fits your product. Templates save time and keep your labels looking the same. Many online tools and software have lots of templates. You can find templates for different shapes and sizes.
When picking a template, remember these things:
Pick a template that matches your product’s shape and size. Round jars need round labels. Bottles usually need rectangle labels.
Make sure the template works with your packaging material. It could be glass, plastic, or cardboard.
Check if the template has space for all the info you need. You might need to add the product name, ingredients, or barcodes.
Choose a style that fits your brand. It can be fun, fancy, bold, or simple.
Think about legal rules. Food, cosmetics, and health products need special details. These can be warnings or expiration dates.
Tip: Using templates helps your brand look the same on every product. This makes your brand easy to spot and builds trust.
Customize Design
After you pick a template, you can make it your own. Customizing lets you show your brand’s style. It also helps you connect with customers. You can use special fonts, colors, pictures, and patterns.
Here’s how to make your label design special:
Add the product name and other important details.
Pick fonts that are easy to read and match your brand.
Use your brand colors to make the label stand out.
Add icons or pictures that fit your product and grab attention.
Put the most important info where people will see it first.
Leave some blank space so the label does not look crowded.
A good label uses colors and clear fonts to make info easy to find. Try not to use too much text or too many colors. That can make the label look messy. Test different designs and ask others what they think before printing.
Note: Print a small batch first to see how the label looks on your product. This helps you find mistakes and make sure the label fits right.
Add Branding
Branding makes your label more than just a sticker. It helps people remember your product and want to buy it again. Add things like your logo, slogan, and brand colors.
To make your labels show off your brand:
Put your logo where people can see it easily. The top or center is a good spot.
Use the same colors and fonts on every label. This gives your products a matching look.
Make your brand name and slogan easy to see and remember.
Add special touches like patterns or textures that show your brand’s style.
Make sure your branding is clear and not hidden by other info.
When all your products have the same branding, people notice your brand faster. Studies show that special packaging helps people remember brands. It also makes them want to buy again. Big brands like Coca-Cola and Nutella use cool labels to make people feel good about their products.
Tip: Always look at your final design before you print. Check for spelling mistakes, blurry pictures, and color problems. A quick check can save money and keep your brand looking great.
If you follow these steps, you can make custom labels that look awesome and help your products do well.
Print and Apply
Print at Home
Lots of people print labels at home for small jobs. This is good if you need less than 5,000 labels each year. More people in this group like printing at home than using a service.
Annual Label Volume | User Preference for Printing Method |
|---|---|
Less than 5,000 packages | Twice as many users prefer printing at home |
5,000 to 30,000 packages | Even split between home and professional |
Over 30,000 packages | Twice as many users prefer professional |
Printing at home costs less at first and has no minimum order. You can print only a few labels when you want. But the labels may not look as nice as professional ones. They might not last as long either. Most home printers use paper labels. These work best inside and on flat things.
Tip: Printing labels at home is quick and saves money for small jobs. It is good for trying out new designs or making special labels.
Use Printing Services
Printing services like PrintRunner, StickerYou, Avery, or Vistaprint help small businesses get great labels. These services have lots of materials, shapes, and finishes. Polyester and vinyl labels do not get ruined by water, chemicals, or sunlight. Polypropylene labels are strong and cost less, so they are good for food and drinks.
Aspect | Home Printing | Commercial Printing (PrintPlace) |
|---|---|---|
Cost per label (small batch) | Lower upfront cost | About $0.10 per label for 250 pieces; cheaper in bulk |
Minimum order quantity | No minimum | 25 for cut-to-size; 250 for roll labels |
Quality | Lower, less durable | Higher, professional finish |
Additional services | None | Expert advice, file review, proofing |
Turnaround time | Immediate, variable quality | Fast, often 1 business day for bulk orders |
Customization & Waste | Limited, possible waste | Customization, less waste |
Recommended for | Small quantities, personal use | Small business, professional needs |
Printing services let you pick shapes like circles, rectangles, ovals, or custom ones. You can also choose finishes like matte, gloss, or foil. These make labels look better and last longer.
Apply to Products
Putting labels on neatly makes products look nice. Clean and dry the spot before you stick the label. Leave a little space from curved edges to stop bubbles or peeling. For lots of labels, machines help put them on fast and straight.
Strong labels use sticky glue and coatings like lamination or UV varnish. Polyester and vinyl labels do not get ruined by water, chemicals, or sun. These things help labels stay clear and easy to read, even in hard places.
Note: Try labels on your product before making a lot. This helps you check if they fit, stick well, and last.
Create Custom Labels: Tips
Troubleshooting
Everyone runs into problems when making labels. Here are some common issues and how to fix them:
Text looks too small or hard to read. Use a font size between 8 and 12 points.
Images appear blurry. Always use images with a resolution of 300 dpi.
Labels do not print to the edge. Add a bleed area in your design.
Some text gets cut off. Keep all important text inside the safety lines.
White outlines show up on dark designs. Try clear labels for a cleaner look.
The design is not centered. Adjust your printer settings before printing.
Labels come out the wrong size. Double-check size guides and templates.
Labels should be clear but look white. Use a transparent background.
Colors look different than expected. Save files in CMYK color mode.
Labels peel off or get damaged by water. Pick waterproof materials.
Other problems can happen, too. Humidity or heat can make labels peel. Store labels in a cool, dry place. If labels wrinkle or do not stick, check if the container shape is even. For hand labeling, mistakes happen more often. Using a simple labeling tool can help keep things straight.
Tip: Test a few labels on your product before printing a large batch. This helps catch problems early.
Best Practices
People can save money and still get great labels by following a few smart steps:
Use recycled or renewable materials to cut costs and help the planet.
Work with local suppliers to save on shipping and get labels faster.
Choose materials that last longer, like waterproof or tear-resistant options.
Keep designs simple and easy to read. This saves ink and looks professional.
Test labels on real products to make sure they fit and last.
Automate labeling for big batches to avoid mistakes and save time.
Build strong relationships with suppliers for better deals and quality.
To make labels look professional and last longer, pick materials that match the product’s needs. For example, use moisture-resistant labels for cold drinks or heat-resistant ones for hot items. High-resolution printing makes colors pop and text sharp. Try special finishes like UV coating or embossing for a premium feel. Always include clear product info and follow any rules for your industry.
Note: Many people learn to create custom labels by watching step-by-step videos or reading guides. The Boss Project blog has a helpful guide for designing labels in Canva. For clothing labels, Custom Clothing Labels offers video tutorials on sewing or ironing labels. These resources make learning easy and fun.
People make custom labels by picking tools, adding brand designs, printing, and sticking them on carefully. Custom labels help shoppers notice products. They show quality, trust, and important details. Many brands use simple designs with special touches to stand out. This helps people remember them and want to buy again. Small businesses that use custom labels often get more loyal customers and grow over time. Anyone can test new designs and tools. Good labels make products look great and share the brand’s story.
FAQ
How can someone make labels waterproof?
People can pick vinyl or polyester for waterproof labels. Adding a clear laminate or UV coating helps, too. These steps keep labels safe from water and moisture.
What printer works best for home label printing?
A color laser printer makes sharp, clean labels. Inkjet printers are good for small jobs. Match your printer to the label material for the best results.
Can a person use regular paper for product labels?
Regular paper is fine for short-term labels. For lasting labels, use adhesive label sheets. These stick better and do not tear as easily.
How does someone remove a label without leaving sticky residue?
Use a hair dryer to warm up the label. This makes the glue soft. Peel the label off slowly. Rubbing alcohol or adhesive remover cleans up any sticky spots.